Wednesday, July 01, 2009

[Samurai] Progress...of sorts...

Those of you who have delved back through the archives of this blog will know that my "samurai project" is my own personal white whale. Initially conceived as a bit of a larfy side-project, it has turned into a borderline obsessive quest of reading, research, and searching for the perfect set of rules.

I had settled some time ago on Taiko! as being a nice compromise between playability and historical accuracy. Last week I finally sat down and painted my first unit, the Matsudaira command stand:


(Apologies for the scribbling on the central banner. I don't even want to know how unintelligble that is!)

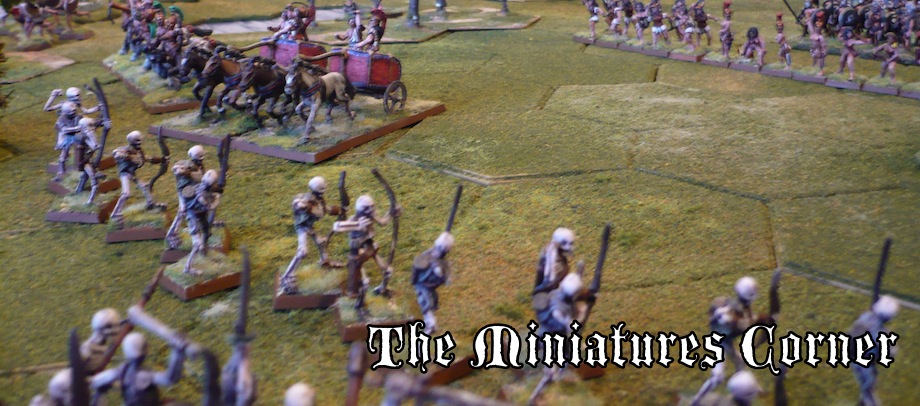
And I then based up our two armies and this is what came out:


Not bad, eh? For those keeping track at home, Des's Ikko-Ikki fanatic army (with its huge block of peasants) is on camera left, my intrepid Matsudaira samurai are on camera right. And that would have been all she wrote except for the fact that I found out that in the time since I started the "samurai project," a new rules system has come out! Thank you very much Crimson Katana for that little piece of info!

What else could I do but resignedly put in an order for Battles in the Age of War from Peter Pig? I thought at the very least I might be able to steal some bits and pieces from it.

BAW arrived in the mail today; I haven't read it cover to cover, but I've done a detailed skim. And I'm totally sold. It takes all of the great esoteric elements of games like Killer Katanas and Daimyo and weds them to a solid, playable system. And it's written with the beginner in mind, meaning someone doesn't have to be an expert in Sengoku warfare to pick it up and get going with it. Just the sort of thing I've ranted about in the past!

I'm not so much of a Phillistine as to ditch Taiko! though. I have a small collection of Zvezda 20mm Samurai and I'll happily use Taiko! for skirmish gaming, as the rules can work at that level just fine.

The only downside to all this is that now I have to do some rebasing! Damn you, Moby Dick!


One of the things I like about BAW (and I'll be writing more in-depth about the rules as I get into them) is that there's a "small form" game that uses smaller armies. I'll be going with this for two reasons: (1) the particular campaign we're simulating was a pretty "small potatoes" provincial conflict to begin with; and (2) that means less minis to paint so we can actually get a game going!!!

Hopefully that'll leave enough surplus samurai to throw together a third army. Maybe Takeda. Hmmm...

At any rate, I'm happy for a chance to rebase. The bases I used are too thin for my taste. I'm going to go for thicker bases to increase grippability factor, always important with small-scale minis with lots of delicate sashimono, yari, and banners.

Monday, June 08, 2009

Blitzkrieg Commander: Encounter at Odessa

I managed to wrangle Des into a game of Blitzkrieg Commander today. I've been itching to play again ever since taking on her Dad a couple weeks ago, not the least reason being that I've actually had time to properly review the rules and was looking forward to playing a "proper" game this time.

As this was only my second game and Des's first, I elected again to run an Encounter scenario. In a way, this could be looked at as a prequel if we decide to do a proper campaign--two recon battalions bumping into each other during the initial hours of the Romanian offensive against Odessa in August 1941.

Other reasons I've been itching to play include the fact that I finished assembling my South Russian village from PaperTerrain, church and all. The base work isn't totally done, but they looked good enough to use in play, so why not? Add in the fact that I finally have a proper digital camera for taking pictures, and I just couldn't wait. Whether my enthusiasm would translate to success on the battlefield remained to be seen...

My BKC forces are failry modest. Right now I have enough minis for a 600-700 point force on both sides. I eBayed some Flames of War figures and used part of the proceeds to pick up enough extra minis to bring the total points to 1,000, which will allow proper attacker-defender scenarios to be played. For now, we went with 500 points, about a battalion to a side. This gave us a bit of choice in what troops to draw from the available pool.

Des lucked out and got a 10% bonus on the roll for the random points modifier. My luck went the other way and I was stuck with a 10% penalty. So right off the bat I found myself assembling an army 100 points short of Des's redoubtable Russians. Here's what we came up with (and for those unfamiliar with BKC, each of the "units," or bases, represents a platoon's equivalent of men, guns, or vehicles):

Russians:
- 1x CO unit
- 4x HQ units
- 6x Infantry (Regular) units
- 6x Infantry (Veterans) units
- 2x Heavy Machinegun units
- 1x Mortar unit
- 2x 45mm ATG unit
- 1x T-26 (MG) Tank unit

Romanians
- 1x CO unit
- 2x HQ units
- 8x Infantry units
- 1x Heavy Machinegun units
- 1x Combat Engineers unit
- 1x Mortar unit
- 1x R.35 Tank unit

Things were not looking good for me at all going in...


This is the initial setup. In keeping with the Ukrainian landscape, I kept hills and trees to a minimum. The buildings and fields provided plenty of potential cover, however. Since I did the seting up, Des got to choose her side of the board. She chose the long edge, opposite from where this picture was taken.

I finally got a bit of luck at the beginning of the game. We used the Mobile Deployment rules to simulate units arriving on the board at a trickle, but all my Command Activations went my way on Turn One and my entire battalion marched onto the board. The units in the center and on my right flank (top of the picture) made several successful Command rolls and blitzed their way across the fields. Des then proceeded to fail half her Activation rolls, holding up all six of her Veteran units for one turn.

The R.35 unit makes its way across the field in support of the infantry.

Des had taken two 45mm anti-tank guns and deployed them on her flanks, so I was obliged to send my tank up the center. Fortunately, the gun never was able to draw a bead on me, but the ATGs served their purpose by funneling my tank movement. In the game I played against Desiree's dad, I took two R.35 platoons and he had no ATGs to counter them--I ran riot over his lines...if you can call a 10cm move and single attack dice "rioting."

Des took a couple shots with our old 'misty-eyed' camera. Certainly does lend a patina of nostalgia, doesn't it? Here you can see her late-comer units, including the wacky, two-turreted T-26, making their way on board. (Speaking of wacky tanks, part of my last minis order was for an Odessa 'Terror Tank,' an ad-hoc AFV consisting of a tractor with steel plates bolted on.)

One of the Built-Up Areas of the village is a Soviet collectivist workhouse. I figured there'd be a nice sturdy wall to protect it and plenty of propaganda posters decorating said wall.

My left flank took a real beating throughout the game. Here they move into position; by the end of the game, only one unit would remain!

Des concentrated most of her forces on her flanks. Thanks to some poor dice rolling on my part, I was unable to press her weak center, or the game might have gone differently. You can see a veritable firing line along her left flank at the top of the picture. This may have been during a brutal firefight that erupted between the Russians in the open and a couple units I'd moved up into the old Orthodox church. Between the units firing from the church and my mortar unit positioned behind the building, I was able to keep a small but steady harassing fire going throughout the game.

Des might have been able to force me out of the church at bayonet point, but she was distracted by my strong push up the center and swung her left flank around to respond to that instead. (Incidentally, you can see the mix of different infantry models I've used to represent Odessa's ad-hoc defenders; in this shot are visible some Naval Infantry from the Black Sea Fleet as well as some dismounted Cossacks.)

Hey! Get out of the shot!

Right. As I was saying, she swung her flank to face my central push. (The push doesn't look so strong here, but that's because I've got several units in buildings by this point.)

The game ended with my tank and infantry units about to boot-scoot away from this closing steel trap...

..and with my left flank in utter tatters.

As the sun sets, the village is in Russian hands...but for how long?

We tallied things up after the final turn and found Des had scratched a minor victory--barely. I was one unit away from forcing a draw. Then again, she was one unit away from breaking my army, which would have handed her a major victory. One more turn probably would have told the story one way or another, but the Encounter scenario's eight turn limit is a harsh mistress.

Actually, I was pretty much saved by some hot dice rolling at the start and end of the game. I only got my "kill count" up significantly with a series of hot activations in the last couple turns, opening up from my strongpoint on the hill. Also, if this hadn't been Des's first game she probably would have played much more aggressively than she did. Oh, and I forgot about the Romanian's "Fragile" rule for the first couple turns. Probably didn't make a difference in the long run, but you never know...

We also used the Tactical Doctrine rule from Cold War Commander, and that worked out really well. Both the Russians and Romanians have Rigid Doctrine, so we were both issuing our units with homogenous orders, and we never did close to within the 15cm (as opposed to 20cm) that Rigid units require to act on their own Initiative.

All in all a fun game, a great learning experience. BKC seems to encourage and reward historical tactics quite well, and I look forward to hopefully getting a little campaigning action going at some point in the near future.

Saturday, June 06, 2009

Building Saving Throws for BKC

Inspired by memories of blowing up buildings in my old Space Marine games--along with the fact that I have some nifty Paper Terrain houses that can double as ruins--I came up with this house rule for Blitzkrieg Commander:

Buildings normally count as hard cover, meaning troops inside a building are hit on a 6.
Furthermore, buildings are generally immune to most types of damage. However, they are vulnerable to artillery barrages.

Any time a building comes under fire from artillery (i.e., if a building is covered in whole or in part by a barrage template), it must make a saving throw.
Building saves work the same as for other models with save values, but due to their size and sturdiness buildings roll their saves on 2D6 instead of 1D6.
Saves are as follows:

Wooden structures - 6
Brick or half-timber/half-stone structures - 5
Stone structures - 4
Reinforced concrete structures - 3

If a building fails its save, it is counted as ruined. A ruined building offers only partial cover, meaning troops inside a ruined building are hit on a 5 or 6.
If troops are in a building when that building is ruined, the troops automatically become suppressed. If the troops are already suppressed, they must fall back a number of centimeters equal to the dice total rolled for the failed save.

Building saves should be made after all other hits and suppression results are worked out.

Example: A unit of troops is inside a brick building when the building comes under artillery fire. The troops suffer one hit and become suppressed from the artillery barrage itself. Furthermore, the building fails its save, rolling a "4". As a result, the troops, having become suppressed, must abandon their position in the building and fall back four centimeters.

Monday, May 25, 2009

Blitzkrieg Commander

Des's family was in town for her Master's graduation ceremonies, so that of course meant a game with her dad Frank was in order. I let the guest decide and he opted for WWII action, so I got to bust out my Odessa Campaign 20mm minis and dive in to Blitzkrieg Commander for the first time!

I was never really in doubt about BKC as a system, and I was not let down. If anything, the game exceeded my expectations. (I'll probably be picking up Future War Commander at some point to finally have some rules to go with my Reaper mechs and Pendraken soldiers.) Despite the fact that it was the first time I'd played the game at all, and that I'd only had time to give the rulebook a cursory glance to refresh my memory--having read through it maybe two or three years ago, then put it on the shelf--the game went smoothly and total time from set-up to clean-up was only about three-and-a-half hours.

My miniatures collection is focused around the Romanian slog towards Odessa in the summer and fall of 1941. I took the Romanians, Frank took the Russians. To keep things simple, we played an Encounter scenario. I snapped some shots at about the mid-point of the game (sorry about the poor lighting conditions, as usual--one of these days I'll get some proper flood lights...):

I continue to be more than happy with my Hexon II tiles. I'm finding that I'll probably need some more slope pieces, but other than that I have more than enough hexes to make for an infinite variety of set-ups. At any rate, here we see how the fighting was shaping up, centering around a small village; those Post-It tags indicate occupied buildings. We managed to divide the village in half by the end of the game.

I tested out the Flanking rules to great success--you can see my R-35s "charging" in (with all of their 10cm move) on the left, sending a unit of dismounted Cossacks falling back in a desperate delaying action.

A close-up shot of the village. Those are Paper Terrain houses. I have the whole "South Russian Village" set, so eventually those'll be mounted on bases to represent Built-Up Areas and there will even be a nifty little Church! I'm also going to come up with some house rules to determine when to go from the "intact" to the "ruined" state (dropping the Hit number by one in the process). Probably something along the lines of how Space Marine used to do it.

Now, this being our first-ever BKC game, along with the fact that I hadn't had a chance to properly review the rules, guaranteed there were a couple boo-boos. Such is the learning process. I effectively forgot about the Initiative phase by the time it would have mattered in the game, but this was balanced out by the fact that we didn't clear Hits in the End Phase. So I think the deadliness of the game was about the same as what it would be normally, but I'll have to play another game, just to make sure. Dang! ;)

Next up I'm going to make some fields and defensive improvements like trenches and wire sections. I'm also going to buy some micro dice in two colors to represent hits and suppressed hits, but I'm also quite happy with the fact that there's very little for me to do. After years of prep work, waiting, painting, and so forth, it's a great relief to finally be able to play something!

ETA: I forgot to mention that the highlight of the game was probably when I sent my unit of Combat Engineers dashing across the no-man's land of the village common (with three successive move orders!) to close assault the Soviet T-26. Thanks to their flamethrower, the Engineers drove the tank back, but were in turn wiped out when the house full of Naval Infantry across the way opened up on them. Posthumous medals for bravery all around!

In all seriousness, though, that sequence was a great example of how much fun BKC's unit activation system is. I was really sweating those last couple order rolls, hoping my Engineers wouldn't find themselves caught out in the open, exposed to fire from three different directions!

Monday, April 20, 2009

Armies of Arcana Battle Report #1

As anticipated, the big day finally came. With my Hexon II terrain flocked and ready to go, we were finally ready, for the first time in nearly two years(!) we busted out the minis and the dice and had ourselves a game.

This was our first outing with Armies of Arcana. As our new fantasy armies aren't painted up yet, we busted out our old Fantasy Warriors armies to test the system. Surprisingly, the armies came out to approximately equal points values in AoA as well, so we were good to go.

Before I get into the battle report proper, my impressions on AoA, both in general and as it applies to Fantasy Warriors.

I have to say that AoA very much lived up to my expectations. Despite being our first game, things flowed very smoothly. We had practically no need of rules lookups, particularly after the first couple turns. One of my biggest issues with FW was the way modifiers could pile up for nearly every roll. It made for either tons of chart lookups or having to keep a bunch of running totals swimming around in our heads. AoA, for the most part, has only a handful of modifiers that come up with any sort of regularity. I also liked the tactical elements of the game, such as the different maneuvers, both out of melee and while engaged.

We'll probably port some of FW into AoA as houserules, particularly the pre-game sequence of reading the omens, making boasts, scouting, etc. Possibly the time clock and Bad Light rules as well.

On to the battle (click the thumbnails for larger pics)...


Here's the Hexon tiles set up in all their glory. I have yet to get together a proper 4x6 table set-up, so this was a roughly 3x5 arrangement. The versatility and aesthetic appeal of the Hexon tiles are exactly what I've been looking for. I couldn't be happier. Turns out I've got way more terrain tiles than I'll ever need, which will be great--a literally endless variety of possible arrangements!

A ground's-eye view of the table. You can see the undulating terrain and hills that the tiles allow you to create.

Here's a view of the armies after set-up. As per the rules, we each set the game-winning objective for the other person. I set Des the objective of defeating my general, she set my objective as defeating her unit of Human Knights (lower right of the photo).

Another view of the deployment.

View from the dwarf lines.

The battle's under way. The dwarves are holding the line as the orcs advance, screened by archers in skirmish formation. Speaking of archers, that was a key difference between AoA and FW--missile fire is much deadlier! The first half of the battle was dominated by missile duels between my orc longbows and Des's dwarven crossbows.

My plans, such as they were, revolved around a pincer-like attack. Here we can see a unit of scimitar orcs coming up on the right flank as my trolls snake their way forward, sheltering from missile fire as long as possible.

And here's the left flank; my other unit of scimitar orcs and a wolf-mounted hero wheeling around the craggy hill, making for the human knights.

The missile duels over (you can see my archers falling back behind the advancing orcs with spears and the dwarven crossbows doing likewise), melee approaches.

Flash forward a couple turns. I had taken a gamble in casting Chaos Vortex from my wizard's lofty vantage point on the hill. In true orcish fashion, the Vortex drifted across both friendly and unfriendly units, wreaking total havoc in the process. The good news is that it completely wiped out a unit of dwarven spears and seriously compromised another unit of dwarves with two-handed axes--but it also took care of fully half of my own unit of spear-orcs! Here they are fleeing from the Vortex as my wizard and general look on helplessly. My center had collapsed.

That's when I decided to take a gamble. I cast Mark of Chaos on my general, hoping to get a nice little bonus for the fight I knew was coming--my general would have to hold the center against the inevitable onslaughts (my general being the victory objective and all...).

I informed Des of the odds: on a roll of 1 thru 4, my general would get a buff. A roll of 5 would have no effect. A roll of 6 and my general blows up.

I rolled a 6. 

Although Des hadn't technically killed my general, we took that as good enough for dwarven victory purposes.

Here's where the left flank stood when the general blew up. An assault was imminent, and things definitely were still very much up in the air. But dinner was calling, and I was willing to take a risk on my general. The risk didn't pay off this time. Next time...

Well, next time I'll hopefully be busting out some sweet Undead action. Oh yes, there will be a next time.

Sunday, April 19, 2009

At long last...back in the saddle!

About three weeks ago I finished up my last two batches of Civil War paint-for-hire miniatures. That was it, as far as commissioned projects go. The end of over two years of having to set my own miniatures second to other peoples'. I thought I might be too burned out to segue into my own stuff, but I surprised even myself with a flood of minis-related work.

First I finished my WWII Odessa project. Then last week I took the weekend and finished up my Hexon terrain. So now we actually have proper terrain to play on! Tomorrow's my birthday, and I'm celebrating with our first game of Armies of Arcana and the new terrain. Pics will follow, of course.

(Since our "new" fantasy armies are still in progress, we'll be using our old Grenadier/Fantasy Warriors armies. I statted them up in AoA and, surprisingly, they came out equally balanced.)

Next on the list are our fantasy armies and, quite unexpectedly, the samurai armies. The reason for the latter moving up the list so quickly is that I ordered a can of Army Painter stain and have come up with a quick-painting scheme utilizing that product.

At any rate, this blog has been long and talk and short on pics for far too long, so without further ado I'm going to play a bit of catch-up now.

First, some pics of the figures I've completed so far for my Undead army.

The renegade Amazon necromancer riding an undead troll (figure by Hasslefree Miniatures):


Next, Mirliton's fantastic recasting of the old Grenadier Undead War Mammoth, with figures by Games Workshop and...Ral Partha? Maybe...?


Lastly, a Reaper Wraith figure, my general:


My vision for this army is that it comes from a Hades-like "Land of the Dead" that periodically overflows into the land of the living. Des's Amazons live on the borders of the Land of the Dead and act as the first line of defense/guardians against these incursions.

Next up are some of my zombie minis. There are eight survivors grouped into four pairs (mostly courtesy of Hasslefree):


A few of my zombies (there are about 30 to 40 total), courtesy of a mix of manufacturers:


Lastly, some of my Odessa project figures. As I've discussed before, I've mounted the figures in "fire teams" on circular slotta bases. Intended to be used with Blitzkrieg Commander, these bases should be usable with nearly any rules set short of a 1:1 skirmish game, which is the sort of rules system I'm distancing myself from anyway.

Some Romanians (plus a German pioneer section); you can see the mix of base types: large circular for squads and heavy weapons, square for command, small circle for section leaders and special troops like this Forward Observer.

Romanian R.35 tanks.

Two Russian anti-tank guns and crews.

Russian T-26 (love those early war tank designs!).

Some of the Soviet forces; you can see the eclectic mix of Odessa's defenders: naval infantry, Red Army, dismounted cossacks...
Related Posts Plugin for WordPress, Blogger...